


1. Log into your cPanel account.
2. In the "Files" section, click on "File Manger" Icon.
![]()
3. cPanel File Manager will be open, select the appropriate domain name or folder location, and press the "Go" button.
4. Navigate to the directory where your .htaccess file is located. If you want to edit the .htaccess file of your root directory, navigate to the public_html folder.
5. If the .htaccess file does not show, click on the "Settings" button in the File Manager. You can find the "Settings" button on the Right Side of the top menu. A new small window will open. Mark the "Show Hidden Files (Dotfiles)" option and click on the "Save" button. You will be able to see the .htaccess file. If it does not exist, create a new one.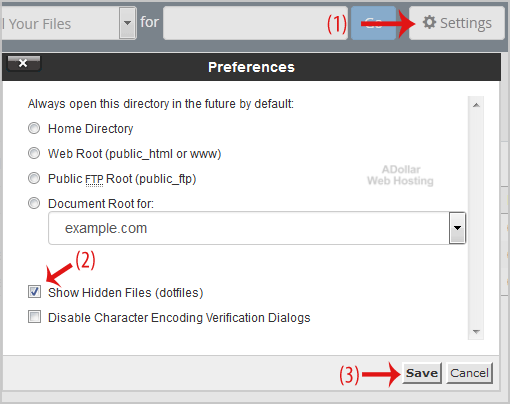
5. Right click on the .htaccess file and then on "Edit" or "Code Edit" in the Context Menu.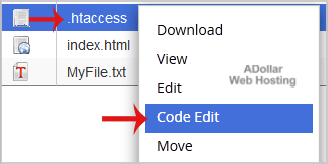
6. If the small "Code Editor" window is open, click on the "Edit" button, which will open a new window with options you can edit.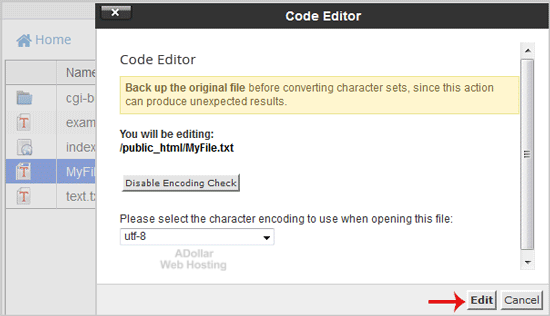
7. Make changes to your .htaccess file and then click on the "Save Changes" button.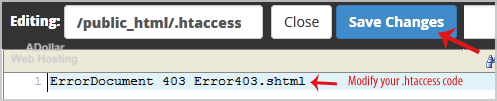
- Home
-
Store
- Browse All
- Web Hosting Packages
- VPS Hosting
- Cloud Hosting
- Free Website Hosting
- Dedicated Server Configuring
- Cloud VPS Server Configuring
- Hackathon Software
- Bulk SMS Credits
- Website/Software/Apps Dev
- E-mail Services
- Website Security
- Website Backup
- SSL Certificates
- SEO Tools
- Register a New Domain
- Transfer Domains to Us
- News
- Knowledgebase
- Contact Us
-
More
